Use Quick Start to set up a child's iPhone or iPad (iOS 17, 18, 26 or later)
If you're a parent or carer in a Family Sharing group, you can use your iPhone or iPad to help set up a child's new device with your preferred parental controls.
If your device and your child's new device are BOTH updated to iOS 18, 26 or later, you can use Quick Start to set up a new device for your child automatically with your preferred parental controls.
Set up a child's device with Quick Start
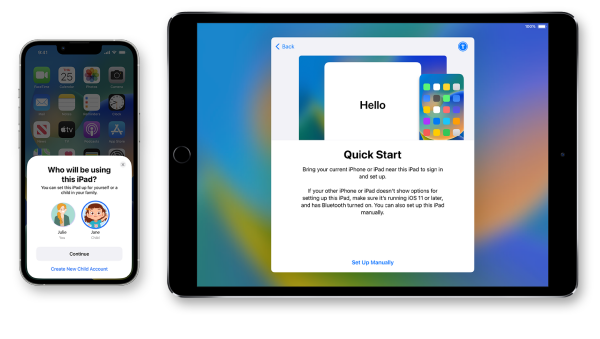
Turn on your child's new device and swipe up to unlock it.
Select country 'Australia' and their language.
Place your device near your child's new device. Then follow the steps below on your device.
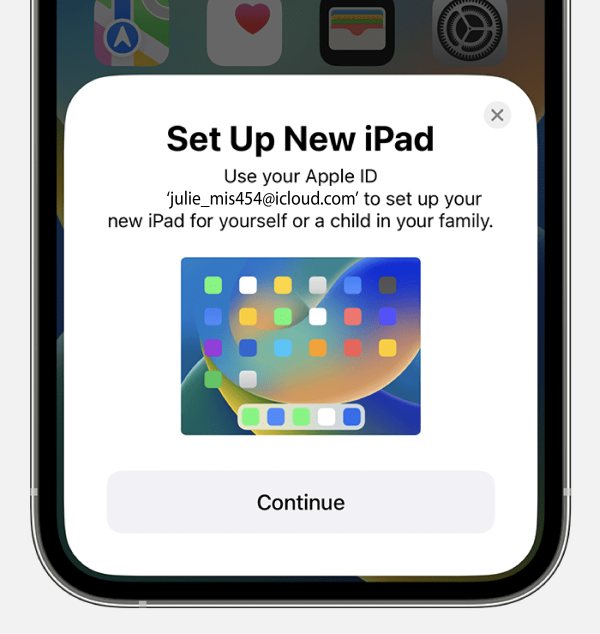
When the Set Up New [Device] card appears, tap Continue.
Wait for an animation to appear on your child's new device. Hold your device over your child's device, then centre the animation in the viewfinder.
Choose who will be using the new device, then tap Continue. You'll only see children in your Family Sharing group who are under 13. Or choose Create New Child Account if you want to add a child who's not in your Family Sharing group yet.
Follow the onscreen steps to finish setting up your child's new device. If you're setting up a device for an existing child in your Family Sharing group, you can set up their current parental controls automatically. If you've chosen to create a new child account, you can create your child's Apple ID (you can use their school email address, however, we suggest you create an iCloud address*), then set up your preferred parental controls.
Create an Apple ID for your child
Instead of sharing an account with your child, which can give them unwanted access to your personal data, create an Apple ID for them. Then you can easily set age-based parental controls, and they can use Family Sharing, Messages, the App Store, and other Apple services.
How to create an Apple ID for your child
Children under the age of 13 cannot create an Apple ID on their own. But if you're the family organiser or a carer, you can create an Apple ID for your child.
To verify that you're an adult, you might need a credit card.
On your iPhone or iPad
Go to Settings > Family.
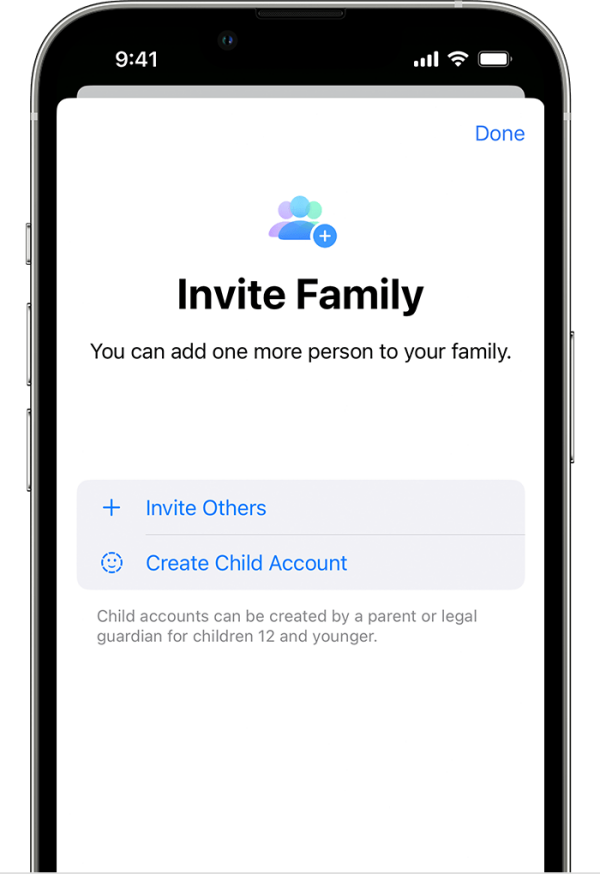
Tap the Add Member button (top right hand corner)
Tap Create Child Account, then tap Continue.
Enter your child's name and birth date. Be sure to enter the correct birth date — you're limited in wat you can change it to later.
Follow the onscreen instructions to finish up the account. For your child's Apple Account, you can use their school email address or the suggested @icloud.com address. We suggest that you use their @icloud address as this will remain with them for the life of their account.
In iOS 17, 18, 26 or iPadOS 17, 18, 26 or later
If you have set up Family Sharing with previous family members on your iCloud account.
Go to Settings > Family.
Tap the Add Member button (top-right-hand corner).
Tap Create Child Account, then tap Continue.
Enter the child's name and date of birth. Make sure you enter the correct date of birth — you cannot change it later.
Follow the onscreen instructions to finish setting up the account. For your child's Apple ID, you can use their school email address, however, we suggest using an @icloud.com address*.
In iOS 17, 18, 26 or iPadOS 17, 18, 26 or later
If you have NOT set up Family Sharing with any other family members on your iCloud account.
Start a family group
One adult in the family — the family organiser — can set up Family Sharing for the group from their iPhone or iPad. If purchase sharing is turned on, the family organiser will pay for family members' purchases and must have a valid payment method on file.
On your iPhone, iPad
Go to Settings.
Tap your name.
Tap Family (or Family Sharing), then tap Set Up Your Family.
Tap on Create Child Account.
Follow the onscreen instructions to finish setting up the account. For your child's Apple ID, you can use their school email address, however, we suggest using an @icloud.com address*.
Press and hold the device's power button until you see the Apple logo. You'll then see "Hello" in many languages. Follow the onscreen instructions to get started.
Tap on Setup Manually.
You need to connect to a Wi-Fi network or a mobile network to activate and continue setting up their device. Tap the Wi-Fi network that you want to use.
Follow the onscreen instructions to set up Face ID or Touch ID to use face recognition or your child's fingerprint to unlock their device and make purchases.
Next, set a six-digit passcode to help protect their data. If you'd like a four-digitpasscode, custom passcode or [no passcode – not advisable], tap Passcode Options.
Select Don't Transfer Apps & Data.
Enter your Child's Apple ID and password.
Follow the onscreen instructions to allow iPadOS to update automatically and set up other features, like iMessage, FaceTime, Location Services, and Analytics.
Setup iPad without another Apple Device
You can set up an iPad for a child under 13 without using another Apple device, but it involves creating a child Apple ID and configuring parental controls directly on the device. Here's how to get it done step by step (instructions may vary depending on the iPad's operating system version):
Step 1: Start the iPad Setup Process
Turn on the iPad by holding the power button until the Apple logo appears.
Select Language and Region.
Connect to Wi-Fi.
Step 2: Create a Child Apple ID on the iPad
Apple requires children under 13 to have an Apple ID managed through **Family Sharing**. Since you don’t have another Apple device, follow these steps:
Set Up as New iPad on the "Apps & Data" screen.
Choose Don’t have an Apple ID? Create a new one.
Tap Create an Apple ID for a Child.
Enter the child's information: - Nam and birthdate (the system will recognise they’re under 13). - You’ll need to verify your age with a credit or debit card (this is only for verification, not a charge).
Create an iCloud email for the child if they don’t have one (e.g., 'name@icloud.com').
Set up a password and security questions for the Apple ID. (It is important that you remember these.)
Step 3: Enable Parental Controls with Screen Time
Once the iPad is set up, immediately configure parental controls to ensure age-appropriate usage.
1. Go to Settings > Screen Time. 2. Tap Turn on Screen Time > This is My Child’s iPad. 3. Set a Screen Time passcode (make sure only you know it).
Key Settings to Adjust:
Downtime: Set periods when the device can’t be used (e.g., bedtime).
App Limits: Limit apps (e.g., 1 hour per day for social media or games).
Content & Privacy Restrictions:
Limit web content and prevent access to explicit content Block in-app purchases and require permission for downloads using **Ask to Buy**.
Step 4: Install Essential Apps (Optional)
Go to the App Store.
Use the newly created child Apple ID to download necessary apps.
Step 5: Set Up Find My iPad (Optional but Recommended)
Go to Settings > Apple ID >Find My.
Enable Find My iPad and Send Last Location. This helps locate the device if it’s lost.
Step 6: Manage Communication Settings
You can restrict or allow certain features like FaceTime and iMessage:
Go to Settings > Screen Time > Communication Limits.
Adjust who the child can communicate with during Screen Time or Downtime (e.g., only with family).
Step 7: Verify the Setup
Test the Apple ID login by downloading an app or accessing iCloud.
Ensure Ask to Buy is working (it sends requests to your Apple ID for app purchases or downloads).
This setup ensures your child’s iPad is safe and appropriate for their age, all while following Apple’s guidelines. If you encounter any issues, feel free to ask!
Setup Screentime
Screen Time comes with iPad Parental controls for your children. With Parental controls, you can now see and monitor what your children are doing with the device. You can monitor which apps they are using and how much time they are spending on the devices and also what time they are using them. With Family Sharing enabled you can get a weekly report of all those things on your dashboard. Family Sharing enables you to: restrict, schedule and approve app limits and downtime remotely.
If a student is going to use a previous Family owned iPad as their learning device. A previously owned iPad must be erased correctly prior to setting up your Child’s Apple ID.
Settings, tap on the name at the top.
Tap on the iCloud account.
Scroll down and tap on ‘Find My iPad’.
Turn off ‘Find My iPad’, enter the Apple ID Password, and tap Turn Off.
Return to iCloud.
Settings, General, Erase All Content and Settings, Enter the iPad’s Passcode.
Erase iPad: Erase.
The iPad will erase and restart at the ‘Hello’ screen.
Reset a child's Apple ID password
If you are the family organiser or carer, you can help reset your child's Apple ID password using your iPhone with iOS 16 or later or iPad with iPadOS 16 or later and two-factor authentication turned on for your Apple ID.